Bag it manual
Summary
Simply put, Bag it allows you to assign an inventory to any item in the scene. This inventory can then hold any other item in the scene and show it in a game-like interface that can be used as a player inventory, a chest, a looted corpse, etc.
Here are listed some of the main functionalities. If this seems like what you want, further down you will find a complete overview of all the features.
- Store multiple instances of the same item.
- Assign descriptions to items.
- Assign “weight” to items.
- Assign categories to items.
- Limit capacity or weight limit of a bag.
- Search and filter items by name, weight, category, etc.
- Track equipped items.
- Create custom equipment slots menus.
- Define “at hand” items among the items in the bag.
Create bags
To start you just have to choose a token/item, right click it and select “Create bag”. This will establish that this token has a bag. Once then, these options appear:
- Delete bag: Cease this bag’s existence, along with all its contents, for them to be forever lost. (Unless you press Ctrl+Z to undo that.)
- Lock/unlock bag: This option prevents opening the bag. Only the GM can see it.
- Open bag: Toggles the bag’s state to “open”.
The important one, "open bag", will set the bag as open and the bag interface will appear.
Basic bag use
Once the bag is open, which is marked by the appearance of a chest icon on the token, any item in the scene that is dragged to the token will be stored in the bag. (Most tokens store when the center of the item touches the bag; in my notes' case, the upper-left corner.)
It is recommended to close the bag once you finish managing it, in order to avoid accidentally storing other tokens while you continue playing.
Having an item in the bag, the basic things to do with it would be:
-
Inspect the item: Click it.
- This will open the item inspection window, which shows:
- The item’s name
- The item’s category (None by default)
- The item’s weight (1 by default)
- The item’s image. Click it, drag it and use the mouse scroll wheel if you wish to zoom or move it.
-
Right click the item:
This gives you 5 options:
- Drop one: Drop 1 instance of that item.
- Drop all: Drop all instances of that item.
- Drop amount: Choose how many instances to drop.
- Equip item: Set the item as “equipped”, showing a distinctive icon on it.
- Delete item: GM only. Erase the item without dropping it.
All the rest of the bag interface
Just gonna list all to be listed:
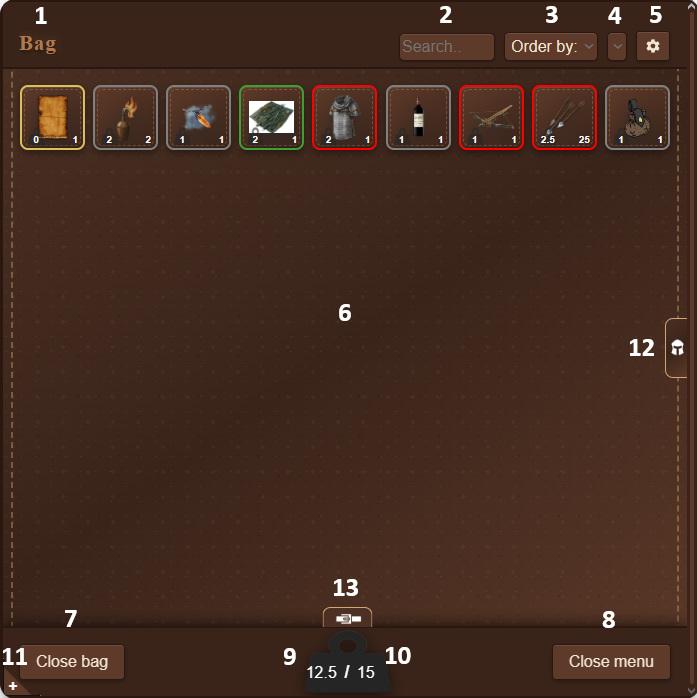
- Bag name: The name of the bag. Click it to change it.
- Search bar: Used to search by name.
- Order by: Used to set the order criteria.
- Filter: Used to filter.
- Settings: In detail just below
- Items zone: Zone where the items show.
- Close bag: Closes the interface and the bag.
- Close menu: Closes only the interface.
- Current weight: Shows the current weight inside the bag.
- Max weight: Max weight of the bag. Change it by clicking it.
- Expand button: Shows the bag interface in big window mode.
- Equipment menu toggle: Shows the equipment menu.
- Belt menu toggle: Shows the belt menu.
Bag settings
Each bag has settings. Here is explained what each of the settings does:
- Theme: Sets the bag theme.
- Equipped items don't add weight: Won’t account the weight of 1 instance of the item if the item is equipped to the bag’s total.
- Enable equipment menu: Enables the equipment menu. More here: Equipment menu.
- Show belt menu: Enables the belt menu. More here: Belt menu.
- Belt menu slots: Defines the amount of slots in the belt.
- Override item's name with item's label: While on, stored items in a bag will show their text label as their name inside the bag. Used if you want your players to be able to rename items on the fly. (Descriptions still will show the real name of the item.)
- Set item's name in item's label on drop: Whenever the item is dropped to the scene, it will have its name as a label IF that item originally didn’t have a proper label.
- Show item's category on item inspect: Hide / unhide category on item inspect.
- Auto-restock belt: When using an item from the belt, the belt will restock that item if there is another instance of the item in the bag.
Equipment menu
To show this one, you have to enable it in the bag settings.
This enables a side menu to track which items you have equipped and in which “slot”. By default I’ve set some slots, but these can be changed via the edit button on the upper-right corner. In edit mode you can:
- Right click anywhere to create a slot.
- Click the × of a slot to delete it.
- Click the edit button of a slot to set its background with any image URL.
- Resize all the slots.
- Move around the slots.
- Rename the equipment window.
With that done, to equip/unequip items, you just have to drag them from or to your main bag zone.
By convenience, dragging an item to the right of the bag interface will auto-open the equipment menu.
Belt menu
To show this one, you have to enable it in the bag settings.
This enables a bottom menu that acts as a “belt”. Drag items to the belt. Later, with the bag closed, you have quick access to the belt’s items. Intended to be used as “I have these items prepared at hand; these are the ones I can access during combat.” You can define the belt capacity in the bag settings and browse the belt with the mouse wheel.
GM window usage
The GM can also click the bag icon in the extensions bar on the top. This allows them to do 3 things:
- Items tab: Used to define items. Whenever you store a scene item in a bag, the system will look in the defined items. If a defined item’s name matches the stored scene item, the bag will use the defined item’s category, weight and description.
- Categories tab: Used to define categories. The upper color is the color by default, used in any item without a category. The category is used to define the color of the borders of the items in the bag and can also be used to filter by category in the bag.
- Misc tab: This tab just has a link to this manual and also allows importing/exporting the defined items and categories. To export just copy the generated text. To import, paste the text and click import. This will overwrite the current items and categories.
General Bag it characteristics / things good to know
Some technical details that may be good to know:
- The bag differentiates items based on the asset name. According to the bag, if same name → same item, even if the images are different.
- The defined items and categories are stored in local storage.
- The items stored retain most of other extension properties. For example, if you store a scene item that is a portal from the Portals extension, it will remain a portal when dropped from the bag.
- A token won’t be stored in a bag if that token is attached to the token that acts as bag, or if the token that acts as bag is attached to that token.
- A bag can be stored inside a bag. With that, if a bag has a max weight of 0, that bag will always weigh 1 while inside another bag, regardless of its contents. If not set to 0, it will weigh as much as its contents.
- You can make a quick variant of an item by changing its name in the accessibility menu or by using the bag setting of override name with label.
- If you inspect an item which is a note, a edit icon will appear to let you edit the note's content while inside the bag